Yes, each model within the Aperta series can tilt up to 6.5 degrees upwards or downwards. The downward tilt can be achieved by rotating the bottom frame so that the height adjustable poles are used at the back of the stand.
The Aperta series is recommended if your speakers would benefit from tilt adjustment to better focus the tweeters to ear level. If your speakers are already at the correct height, then the OREA series is recommended as a low-profile isolation solution.
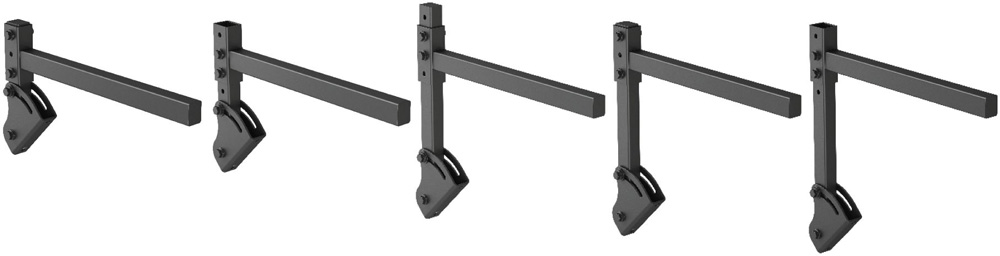
The Aperta has moved another step forward in terms of design, aesthetics, quality, and performance.
The ISO Stand Series was developed for the pro audio industry for users ranging from audio professionals to music hobbyists. In a desktop situation, typically our ears are about 20 inches above the desk. The ISO-Stand Series offers 14 variations of height and tilt adjustment to optimize the placement of your speakers. The kit comes with 2 different lengths of tubes, offering varying levels of height as well as spacers to allow you to tilt the stands up to 6.5 degrees in either direction. The frames of the ISO-Stands are made of high-impact ABS and the poles are made of stainless steel. The ISO-Stands comes in a black finish.
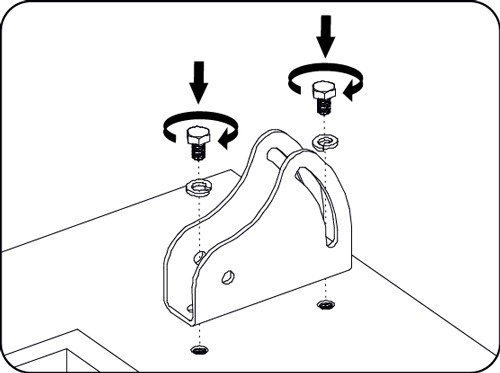
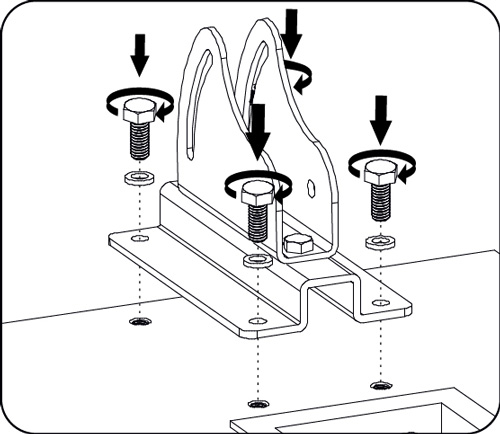
While the ISO-L8R series is designed for nearfield studio monitors, the Aperta series was created for the home audio market with bookshelf and center channel speakers. Made of aluminum, they have more of a stylized look to them and are considered a more premium product. The Aperta series does not have a taller height setting because in a typical home audio setting, the height adjustment is not often beneficial because of the greater distance between the listening position and the speakers. The Aperta stands offer 6.5 degrees of tilt by allowing you to “dial-in” your desired angle using the built-in adjustment. The isolators used in the Aperta’s have been redesigned and the frames of the stands are stiffer resulting in further refined performance. The Aperta’s are offered in two colors, black, and aluminum.
No, the Aperta series only comes with 1 length of the tube. The tilt adjustment feature can be used to better focus the speakers to ear level. If additional height is required, we recommend placing something solid underneath the Aperta stands to raise them to the height that is required. Alternatively, the ISO-Stand series offers a taller height setting.
For best results, we recommend positioning the stands with the IsoAcoustics logo facing forward, in the same direction as the drivers. For a clean look, you can turn the stands backwards so that the logo is not visible.
The IsoAcoustics patented isolators are directional. They are shaped with an internal taper and concave that prevents off axis movements and keeps the energy on-axis and aligned with the direction of the transducer’s travel
If the speakers are fastened to the stands, then they tend to act like one and we recommend installing the GAIA’s underneath the floor stands.
If the speakers are resting on top of the stands, then we recommend isolating between the speaker and the stand. The Aperta series is a great option if the tilt adjustment is required to help focus the tweeters to ear level. Please ensure that the top plate of the stand is large enough for the Aperta stand. If the top plate is not large enough, please see Aperta plate.
If the speaker is already at ear level, then we recommend isolating using the OREA series positioned directly underneath the speaker.
We recommend measuring the dimensions of the Aperta stand against the flat bottom surface of your speaker to verify how they will fit. The speaker should be the same size or larger than the stand. A few inches of overhang are acceptable. We recommend using our online calculator to determine which Aperta model is the best fit for your speakers. If you have any questions or concerns, you can submit an inquiry to IsoAcoustics for review through the online calculator. A representative from IsoAcoustics will review the details and respond by email.
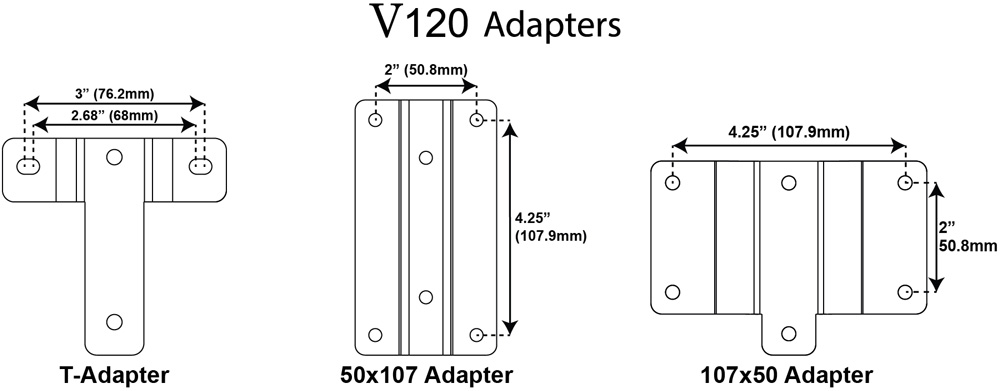
The Aperta 300 is a great fit for many center channel speakers. For wider center channel speakers, we recommend using a pair of Aperta or Aperta200 stands. The Aperta stands can be positioned side by side with a space between the stands. We recommend checking the IsoAcoustics Online Calculator to see which Aperta stands are recommended for your center channel speaker.
The Aperta sub is designed for isolating subwoofers. It has a low profile and innovative shape to avoid interference with existing feet. Subwoofers are often positioned on carpeted floor, so the Aperta Sub includes Carpet Disks to provide a strong connection through the carpet to provide a solid foundation for the Aperta Sub. The Aperta Sub is available only in black.
The other Aperta models are designed for bookshelf speakers. They feature our patented isolation and have built-in tilt adjustment that can be dialed-in 6.5 degrees upwards and downwards to optimize your speaker placement and focus. The Aperta, Aperta200 and Aperta300 are available in black and silver.
Yes, each Aperta Sub includes 4 Carpet Discs to be assembled in conjunction with thick pile carpets. These Disks provide a strong connection with the flooring below and make sure your subwoofer still has a solid base.
The Aperta Sub is quite possibly the simplest of our products to use. With a sculpted aluminum frame, the Aperta Sub is delivered in the box ready for use. This means all you need to do is simply place it underneath your sub and enjoy listening to the benefits of IsoAcoustics patented isolation technology.
For best results, we recommend positioning the stands with the IsoAcoustics logo facing forward, in the same direction as the driver. For a clean look, you can turn the stands backwards so that the logo is not visible.
The IsoAcoustics patented isolators are directional. They are shaped with an internal taper and concave that prevents off axis movements and keeps the energy on-axis and aligned with the direction of the transducer’s travel
For side-firing subwoofers, the Aperta Sub will work best turned sideways so the isolators are aligned with the driver.
We recommend measuring the dimensions of the Aperta Sub against the flat bottom surface of your subwoofer to verify how they will fit. The subwoofer should be the same size or larger than the stand. A few inches of overhang on each side is acceptable. We recommend using our online calculator to determine if the Aperta Sub is the best fit for your speakers. If you have any questions or concerns, you can submit an inquiry to IsoAcoustics for review through the online calculator. A representative from IsoAcoustics will review the details and respond by email.
No, the Aperta Sub does not feature height or tilt adjustment. The other models in the Aperta series feature tilt adjustment because they are designed to be used with bookshelf speakers which require proper focus to ear level. The Aperta Sub is designed for use with subwoofers which do not require tilt adjustment.
The ApertaSub is 10.5” W x 11.5” D (265x290mm) and has a low profile at 1.3” (33mm) in height. The Aperta sub has a rigid sculpted aluminum frame and an innovative shape that allows the Aperta Sub to be positioned directly underneath the subwoofer cabinet without interference with the existing subwoofer feet. The Aperta Sub does not require assembly, includes carpet disks for installation on thick carpeted surfaces and features more advanced isolators that provide superior performance.
The ISO-200Sub measures 7.8” W x 10” D (200x255mm) and is taller at 3.75” (95mm). The ISO-200Sub is made of high-impact ABS and the poles are made of stainless steel. Some assembly is required. Carpet disks are not available for the ISO-200 Sub. A rigid platform (Ex. Granite or marble) is recommended when positioned on thick carpet surfaces.
The ApertaSub is a single unit that is very easy to setup underneath a subwoofer. It is a fixed size that does not fit all subwoofer sizes. The Aperta Sub includes Carpet Disks to provide a strong connection through carpeted surfaces.
The ISO-Puck models require multiple units underneath each subwoofer. The position of the ISO-Puck isolators can be adjusted, so the ISO-Pucks can be used with subwoofers of any size. The setup using the ISO-Pucks requires a little more effort to correctly position them underneath a subwoofer and orient them correctly. Carpet disks cannot be used with the ISO-Puck models. When used on a thick carpeted floor, one option is positioning a piece of granite or marble on top of the carpet.
The ApertaSub is a single unit that is very easy to setup underneath a subwoofer. It is a fixed size that does not fit all subwoofer sizes. The Aperta Sub includes Carpet Disks to provide a strong connection through carpeted surfaces. The ApertaSub has a weight capacity of 80 lbs (36.3 KG) and also works well with lighter subwoofers.
The OREA models require multiple units underneath each subwoofer. The position of the OREA isolators can be adjusted, so the OREAs can be used with subwoofers of any size. The setup using the OREAs requires a little more effort to correctly position them underneath a subwoofer and orient them correctly. Carpet disks are not available for the OREA models. When used on a thick carpeted floor, one option is positioning a piece of granite or marble on top of the carpet. The OREA models each work over a narrower weight range and provide excellent performance within these ranges.
Isolation is effective on all types of flooring to minimize structure borne vibrations and prevent vibrations from reflecting from the supporting surface.
There is a common misconception that isolation is not required on hard concrete floors, but vibrations reflect back up from the solid concrete floor and also effectively travel quickly through concrete.
When used on thicker carpeting, the addition of the GAIA carpet disks can assist the GAIA and GAIA Titan have better connection to the floor.
The GAIA model should be selected based on the weight that they are supporting. The weight limits we set are based on the performance curve. The GAIAs perform well up to the specified weight limits, but once you are within 10% of the weight limit, we recommend using the next size up for best results. We do not recommend exceeding the weight limits of the GAIA’s or GAIA-TITAN’s.
Optimal results are achieved by installing the GAIA isolators with the logo facing forward, in line with the speaker’s drivers. Alternatively, they can be rotated 180 degrees to face the rear. The isolators are directional and are designed to be aligned with the speaker’s motive forces. The direction of the IsoAcoustics logo does not matter when used with turntables or audio components.
We have found the best results by orienting the GAIA’s to be front-facing, in line with the listening position.
The GAIA’s and GAIA-TITAN isolators come with thread adaptors for the 3 most common thread sizes which fit the majority of speakers. The thread adaptor sizes included are as follows:
A wide variety of alternative thread sizes are available upon request through IsoAcoustics distributors.
The GAIA isolators come with the 3 most common thread sizes. If you require a different size, they can be ordered through the dealer that is selling the GAIA’s, or through our distributor. Click Here for the contact information for our distributor for your country.
If the speakers do not have threads, then the GAIA’s are not recommended. The OREA series is a common alternative when threads are not available.
Threaded inserts are available at most hardware stores and can be installed in the base of many types of speakers, but this is not typically recommended because of the risk of damaging the speaker. After the threaded inserts are installed into the speaker, the GAIA’s can be installed.
The GAIA series products are installed by threading into the base of speakers or components. The Advantage of this strong connection with the speaker or component is that all of the energy is managed by the internal isolators of the GAIA. This has a slight advantage compared to our other products which grip the bottom of the speaker by the isolators.
On smooth floors like hardwood, we recommend sliding a cloth underneath the GAIA’s by tilting the speakers to each side. Once the speakers with GAIA’s are on top of the cloth, the speakers can slide along the floors into position.
On carpeted floors furniture sliders can be placed under each GAIA to help them slide into place on the carpet.
Yes. For thicker carpet, we recommend using the GAIA carpet discs for best results so that that the GAIA’s connect to a solid surface.
1. Choose the correct threaded stud for your speakers, thread into GAIA, and tighten with the wrench provided.
2. Install locking nut and tighten by hand up against GAIA Housing.
3. Add locking nut to the upper threaded section.
4. Thread stud into the speaker (minimum 4 complete turns), align logo with the listening position and tighten locking nut up against the bottom of the speaker.
We do not recommend exceeding the specified weight limit. The weight limits are set based on the performance curve, not based on how much weight they can support. The performance of the GAIA is still strong at the weight limit but is quickly declining above this weight. If your speakers are within 10% of the weight limit, we recommend using a larger GAIA model for the best results.
Please click here for information on thread sizes and instructions on how to determine the thread size for your speaker or subwoofer.
Each model of GAIA Isolator comes with 3 common thread sizes. If none of these meet your needs, we also have many other thread sizes available through our distributors.
The threads included with the GAIA’s are as follows:
The GAIA I includes M12-1.25, M8-1.25 and 1/4”-20
The GAIA II includes M8-1.25, M6-1.0 and 1/4”-20
The GAIA III includes M8-1.25, M6-1.0 and 1/4”-20
Click here for more information on thread sizes and instructions on how to determine the thread size for your speaker or subwoofer.
If the speakers are fastened to the stands, then they tend to act as one and the GAIA series are recommended for installation on the floor stand.
If the speakers are resting on top of the stands, then we recommend isolation between the speaker and the stand. The OREA series are a great option in this case.
The GAIA’s and GAIA-TITAN isolators come with thread adaptors for the 3 most common thread sizes which fit the majority of speakers. The thread adaptor sizes included are as follows:
A wide variety of alternative thread sizes are available upon request through IsoAcoustics distributors.
The GAIA isolators come with the 3 most common thread sizes. If you require a different size, they can be ordered through the dealer that is selling the GAIA’s, or through our distributor. Click Here for the contact information for our distributor for your country.
1. Choose the correct threaded stud for your speakers, thread into GAIA, and tighten with the wrench provided.
2. Install locking nut and tighten by hand up against GAIA Housing.
3. Add locking nut to the upper threaded section.
4. Thread stud into the speaker (minimum 4 complete turns), align logo with the listening position and tighten locking nut up against the bottom of the speaker.
We do not recommend exceeding the specified weight limit. The weight limits are set based on the performance curve, not based on how much weight they can support. The performance of the GAIA is still strong at the weight limit but is quickly declining above this weight. If your speakers are within 10% of the weight limit, we recommend using a larger GAIA model for the best results.
Please click here for information on thread sizes and instructions on how to determine the thread size for your speaker or subwoofer.
Each model of GAIA Isolator comes with 3 common thread sizes. If none of these meet your needs, we also have many other thread sizes available through our distributors.
The threads included with the GAIA’s are as follows:
The GAIA I includes M12-1.25, M8-1.25 and 1/4”-20
The GAIA II includes M8-1.25, M6-1.0 and 1/4”-20
The GAIA III includes M8-1.25, M6-1.0 and 1/4”-20
Click here for more information on thread sizes and instructions on how to determine the thread size for your speaker or subwoofer.
Maple and Walnut were chosen based on appearance, hardness and performance. Maple and Walnut are considered superior tonal woods, commonly used in the manufacture of fine guitars, pianos and violins. The difference between Maple and Walnut is mainly in their appearance. The Maple and Walnut platforms provide the same level of performance. Maple and Walnut platforms are known for their detailed, transparent and uncolored sound. The Maple board has a Janka Hardness rating of 1450 and the Walnut has a hardness rating of 1010. The hardness also makes the platforms very durable and resistant to scratches and dents. The butcher blocks are sealed with a urethane-based satin finish which is resistant to stains and most solvents.
The OREA’s provide a high degree of isolation by using IsoAcoustics patented isolation technology to absorb vibrations. The OREA’s are sold individually. 3 or more OREA’s can be used underneath a turntable or component.
The Delos provides a flat stable platform for isolating turntables or tube amplifiers. In addition to using IsoAcoustics patented isolation technology, the Butcher Block also provides mass. The mass of the butcher block complements the IsoAcoustics isolators to provide stability and more effectively eliminate the effects of structural vibrations and resonances.
The DELOS is always recommended when a turntable has an external motor as it will support the table and motor at the same height level.
Both the zaZen and DELOS feature dense platforms combined with integrated IsoAcoustics isolators. They each provide a low noise floor to allow turntables and components to reveal greater clarity and detail. The DELOS series is designed for heavier turntables that weigh up to 100 lbs. and features a larger butcher block platform with larger integrated isolators. The zaZen has a lower profile and is designed for lighter turntables and components that weigh up to 40 lbs. The DELOS is available in Maple or Walnut which are both very dense and hardwoods. The zaZen platform is denser by volume, but still much lighter than the DELOS models because of its smaller size which is more ideal for lighter components.
The specified weight limits are determined based on the performance curves. The products are able to support additional weight without harm, but the isolation performance is beginning to decline above the specified weight limits.
The DELOS works for both Turntables and other components such as tube amplifiers. The Delos decouples the turntable or components from the supporting surface to dramatically diminish structural vibrations and resonances
After seasoning, “rails” or “staves” of prime maple and walnut are hand selected and sorted. They are then cut-to-size, eliminating defects caused by nature. The laminated individual pieces of wood come together in a unique pattern of colors and grain. No two pieces of wood are ever the same. This laminated construction results in a very durable and stable structure with great acoustic properties and an aesthetically pleasing finish.
The integrated isolators are based off the design of the award winning GAIA Series. The isolators use IsoAcoustics patented design which consists of a top isolator, bottom isolator and a connector. The isolation is a result of the way the 3 parts work together, so there is not a single path connecting the live equipment to the supporting surface. It is the shape, durometer and material characteristics of the isolators that are tuned for a given weight capacity. The isolators are absorbing the vibrations so they do not resonate through, or reflect off the hard supporting surface. The isolators are partially recessed into the butcher block and fastened into place for a strong connection to the butcher block.
The DELOS models are designed to be used on a level surface. The DELOS Butcher blocks do not have height adjustment.
Repairing Scratches: Step-by-Step Guide
Note: Always work in the direction of the wood grain to maintain the integrity and appearance of your butcher block.
The Aperta has moved another step forward in terms of design, aesthetics, quality, and performance.
The ISO Stand Series was developed for the pro audio industry for users ranging from audio professionals to music hobbyists. In a desktop situation, typically our ears are about 20 inches above the desk. The ISO-Stand Series offers 14 variations of height and tilt adjustment to optimize the placement of your speakers. The kit comes with 2 different lengths of tubes, offering varying levels of height as well as spacers to allow you to tilt the stands up to 6.5 degrees in either direction. The frames of the ISO-Stands are made of high-impact ABS and the poles are made of stainless steel. The ISO-Stand products come in a black finish.
While the ISO-Stand series is designed for nearfield studio monitors, the Aperta series was created for the home audio market with bookshelf and center channel speakers. Made of aluminum, they have more of a stylized look to them and are considered a more premium product. The Aperta series does not have a taller height setting because, in a typical home audio setting, the height adjustment is not often beneficial because of the greater distance between the listening position and the speakers. The Aperta stands offer 6.5 degrees of tilt by allowing you to “dial-in” your desired angle using the built-in adjustment. The isolators used in the Aperta’s have been redesigned and the frames of the stands are stiffer resulting in further refined performance. The Aperta’s are offered in two colors, black, and aluminum.
We recommend measuring the dimensions of the ISO-Stands against the flat bottom surface of your monitors to verify how they will fit. The monitors should be the same size or larger than the stand. A few inches of overhang are acceptable. We recommend using our online calculator to determine which ISO-Stand model is the best fit for your monitors. If you are not certain which model is the best fit, you can submit an inquiry to IsoAcoustics for review. A representative from IsoAcoustics will review the details and respond to confirm which model is recommended.
The new ISO-Stand series has 3 main differences compared to the ISO-L8R series.
1) In the lower setting (using the short poles) the new ISO series of stands have a lower profile compared to the ISO-L8R models.
2) The ISO-Stand Series features a new frame design with an improved look.
3) The ISO-Stand Series has a newer version of the isolator with improved performance.
The ISO-200SUB is intended for subwoofers. The ISO-200SUB is sold as a single unit, comes only with short tubes (long tubes are not included) and the ISO-200SUB does not include inserts for tilt. The ISO-200 is sold in pairs and includes the poles and inserts required for height and tilt adjustment.
For best results, we recommend positioning the stands with the IsoAcoustics logo facing forward, in the same direction as the drivers. We do not recommend rotating the stands 90 degrees. The IsoAcoustics patented isolators are directional. They are shaped with an internal taper and concave that prevents off-axis movements and keeps the energy on-axis and aligned with the direction of the transducer’s travel. Alternatively, the stands can be rotated 180 degrees so that the logo is not visible.
Sometimes air can get trapped inside the isolators which cause the tubes to not be seated properly and ultimately the frames will be uneven. We recommend taking the stand apart, pulling the tubes out of the top and bottom frames (you can leave the inserts inside the tubes for tilting). Put the tubes inside the bottom frame and push them in firmly so they are properly seated. Then take the top frame and set it in place. One by one go around and apply pressure to the top and bottom isolator pushing them together. You will want to go around 3 or 4 times, each time applying more pressure. This is the best way to ensure that the air is allowed to properly escape.
The ISO-PUCK models are designed to be used in multiples to match the weight of each speaker or equipment in which they are supporting. A minimum of 3 isolators is required for each item they are isolating. The weight limits are as follows:
· ISO-Puck mini – max 6 lbs (2.75 KG) per isolator.
· ISO-Puck – max 20 lbs (9 KG) per isolator.
· ISO-Puck 76 – max 40 lbs (18 KG) per isolator.
For best results, we recommend not getting within 10% of the specified weight limits to allow for uneven weight distribution.
The weight limits are as follows:
· ISO-Puck mini – max 6lbs (2.75 KG) per isolator.
· ISO-Puck – max 20lbs (9 KG) per isolator.
· ISO-Puck 76 – max 40 lbs (18 KG) per isolator.
For best results, we recommend not getting within 10% of the specified weight limits to allow for uneven weight distribution.
The ISO-PUCK was originally designed for the Pro Audio market and is a very versatile isolator for studio monitors, guitar/bass amps and cabinets, subwoofers, DJ equipment, mic stands and more.
The ISO-PUCK was originally designed for the pro audio and Musical Instrument (MI) channel, and used with studio monitors, guitar/bass amps, DJ turntables, etc. The OREA, on the other hand, is designed for home audio. The performance curve for the OREA models are narrower in weight range and will provide a slightly stronger sonic benefit in its range than the ISO-PUCKs. The more effective isolation results in more sound clarity and focus.
Click here for more information on the difference between the ISO-Pucks and OREA's
For best results, we recommend positioning the ISO-PUCK with the IsoAcoustics logo facing forward, in the same direction as the drivers. We do not recommend rotating 90 degrees. The IsoAcoustics patented isolators are directional. They are shaped with an internal taper and concave that prevents off-axis movements and keeps the energy on-axis and aligned with the direction of the transducer’s travel. Alternatively, the ISO-PUCK can be rotated 180 degrees so that the logo is not visible.
The ISO-PUCKs do not have height and tilt adjustment. If you require height and tilt adjustment, we recommend the ISO-Stands or Aperta series of stands.
The ISO-PUCK 76 and ISO-PUCK are designed for heavier speakers and monitors. The ISO-PUCK 76 has a weight capacity of 40 lbs. (18 kg) each and the ISO-PUCK has a weight capacity of 20 lbs. (9 kg) each. They are both sold in pairs and have a rigid black powder-coated steel housing.
The ISO-PUCK mini is designed for higher speakers and monitors with a weight capacity of 6 lbs. (2.75 kg) each. They are sold in sets of 8 and have injection-molded black housing.
The suction cup effect is not required for a strong connection. The ISO-Pucks will have a suction cup connection to smoother surfaces. For textured surfaces, the ISO-Puck’s will have a strong friction grip.
All audio equipment will benefit from isolation. The biggest gains can be achieved by isolating speakers and subwoofers. Isolating turntables, tube amplifiers, and CD players are good places to start because they are particularly sensitive to vibration. Isolating Preamp tubes is important as issues will be amplified later in the chain.
The ISO-PUCK was originally designed for the pro audio and Musical Instrument (MI) channel, and used with studio monitors, guitar/bass amps, DJ turntables, etc. The OREA, on the other hand, is designed for home audio. The performance curve for the OREA models are narrower in weight range and will provide a slightly stronger sonic benefit in its range than the ISO-PUCKs. The more effective isolation results in more sound clarity and focus.
Click here for more information on the difference between the ISO-Pucks and OREA's
The Aperta series is recommended if your speakers would benefit from tilt adjustment to better focus the tweeters to ear level. If your speakers are already at the correct height, then the OREA series is recommended as a low-profile isolation solution.
Yes, the OREA series can be used with speakers.
The suction cup effect is not required for a strong connection. The OREA’s will have a suction cup connection to smoother surfaces. For textured surfaces, the OREA’s will have a strong friction grip.
We recommend choosing the OREA model based on the weight of the speaker or component that they will be supporting. It is common to use 3 or 4 OREA isolators for each component or speaker. The weight capacity per OREA isolator is as follows:
We recommend using the IsoAcoustics Online calculator for determining which model to use with your speaker or component.
The specified weight limits are determined based on the performance curves. The products can support additional weight without harm, but the isolation performance is beginning to decline above the specified weights.
Equipment can be sensitive to vibrations and forces. Removing parasitic vibrations releases new levels of sound clarity and openness when used with amplifiers, DAC’s, CD Players, turntables, and more.
When used with speakers, optimal results are achieved by positioning the OREA’s with the logo facing forward, in line with the speaker’s drivers. When using the OREA’s on turntables and other electronic components, the orientation of the IsoAcoustics logo will have no impact on the performance.
Both the zaZen and DELOS feature dense platforms combined with integrated IsoAcoustics isolators. They each provide a low noise floor to allow turntables and components to reveal greater clarity and detail. The DELOS series is designed for heavier turntables that weigh up to 100lbs.and features a larger butcher block platform with larger integrated isolators. The zaZen has a lower profile and is designed for lighter turntables and components that weigh up to 40 lbs. The DELOS is available in Maple or Walnut which are both very dense and hardwoods. The zaZen platform is denser by volume, but still much lighter than the DELOS models because of its smaller size which is more ideal for lighter components.
The OREA’s are sold individually and feature our patented isolation design which manages the energy from the component and provides isolation from external vibrations. We recommend positioning the OREA’s directly underneath the chassis of a turntable or component and not underneath the existing feet so that the weight is applied over the entire top surface of the OREA and not concentrated on a small section of the OREA. The zaZen is an isolation platform that combines our integrated isolators with the stability of the platform’s mass to provide an effective isolation solution for turntables, tube amps, and sensitive audio components. The zaZen is an isolation platform and is easier to set up as the entire component is positioned on the zaZen, using the existing feet. The zaZen isolation platform is recommended for components where the OREA’s cannot be positioned directly underneath the chassis of the component. The zaZen is also the best option for turntables with external motors. This is because when you raise the table, you also need to raise the motor to keep the belt aligned.
The zaZen model should be selected based on the weight they will be supporting. The zaZen I is recommended for lighter turntables and components and has a weight capacity of 25lbs(11.3 KG). The zaZen II has a weight capacity of up to 40lbs(18.1 kg). It is also important to ensure that the component can fit on top of the zaZen platform which measures 17′′Wide x 15′′Depth (432 x 381mm). For heavier turntables and components, we recommend the DELOS series.
The zaZen isolation platforms are designed to be used on a level surface. The zaZen platforms do not have height adjustment.
The integrated isolators are based on the design of the award-winning GAIA Series. The isolators use IsoAcoustics patented design which consists of a top isolator, bottom isolator, and a connector. The isolation is a result of the way the 3 parts work together, so there is not a single path connecting the live equipment to the supporting surface. It is the shape, durometer, and material characteristics of the isolators that are tuned for a given weight capacity. The isolators are absorbing the vibrations, so they do not resonate through, or reflect off the supporting surface. The isolators are partially recessed into the platform and fastened into place for a strong connection to the platform.

Yes, the V120 can be wall mounted using the V120 Wall Bracket, or adapting to third-party products.
The V120 can be used with pro speakers that weigh up to 40 lbs (18.1 kg). The weight of the V120 brackets and adapters does not need to be considered when determining the weight capacity. If the speaker has a U bracket for mounting to the V120, then the combined weight of the speaker and U bracket must be 40 lbs (18.1 kg) or less.
If the mounting threads are located on the back of the speaker, it is best to first install the L-Bracket or C-Bracket on the speaker. Adjusting the tilt angle will shift the center of mass, so it is best to install the bracket with the speaker into the V120 and adjust the tilt angle to its optimal position. The L-Bracket or C-Bracket can then slide forwards or backwards to balance the weight underneath the V120. If you are not certain it is balanced properly, you can remove the speaker and L-Bracket or C-Bracket from the V120 and try finding the balance point on the L-Bracket or C-Bracket. Once the balance point is found, slide the bracket back into the V120 mount with the balance point centered in the V120 mount. The weight does not need to be perfectly balanced, but balancing the weight over the isolators will ensure optimal performance.

IsoAcoustics Inc.
39 Main street North, Unit 5
Markham, ON, Canada L3P 1X3